Project Overview
Nomalyze is a recipe management and analytics app that began as my final Django course project and later evolved into a fuller full-stack project with two interfaces: the original server-rendered Django app and a separate Vue 3 + TypeScript single-page frontend.
The core Django app lets users manage a personal recipe collection, calculate recipe difficulty, search and filter recipes, and analyze the collection with simple charts. After completing the original version, I extended the project with a Vue frontend that consumes the same backend through a Django REST Framework API with JWT authentication.
Nomalyze served as a practical way to connect backend fundamentals, data modeling, analytics, deployment, and modern frontend development in one product. The Django version demonstrates server-side application structure, business logic, testing, and deployment, while the Vue version adds API-driven frontend architecture, client-side routing, state management, and a more interactive user interface.
- Role: Solo full-stack developer
- Context: Course project for a Full-Stack Web Development program
- Backend: Python, Django, Django REST Framework, JWT authentication
- Frontend: Vue 3, TypeScript, Tailwind CSS, Chart.js, Django templates
- Data: PostgreSQL, Pandas, Matplotlib
- Deployment: Render, Netlify
The original course brief was to build a recipe app with Django, including basic CRUD, a computed “difficulty” value, and some form of analytics. I treated it as a chance to practice real-world full-stack concerns: data modeling, business logic, authentication, testing, and deployment. The later Vue extension gave me a second challenge: exposing the same product through an API-driven SPA while keeping the original Django version available.
Show Hide details
The Challenge
The original course brief asked for a Django-based recipe application where users could manage their own collection of dishes. Beyond simply storing recipes, the specification also introduced the idea of calculating how “difficult” a recipe is, and surfacing some basic statistics about the overall collection.
In practical terms, that meant turning a familiar domain — recipes — into a working web product that:
- models recipes and their attributes in a database;
- assigns each recipe a difficulty level;
- supports search and filtering;
- and offers a clearer overview of the collection than just a long list.
From a learning perspective, my challenge was to implement this brief in a way that felt close to a real-world project: using Django’s strengths, keeping the interface straightforward for non-technical users, and handling deployment details such as environment configuration, static files, and a production database.
After the Django version was complete, I added a second challenge: turning the same product into an API-driven frontend experience. This meant exposing selected backend functionality through Django REST Framework, handling JWT authentication from a separate Vue app, and rebuilding key user flows with client-side routing, state management, and interactive chart rendering
Nomalyze is the resulting app: a personal recipe manager that not only stores recipes, but also analyzes them and now offers both a server-rendered Django interface and a Vue single-page frontend.
Objectives and Success Criteria
Within the original Django brief, I defined a few concrete goals for myself:
- Implement solid recipe management
Allow a user to add, view, edit, and delete recipes in a clean, simple interface. - Turn “difficulty” into working logic
Use factors such as preparation time, cooking time, and ingredient count to automatically label each recipe as Easy, Medium, Intermediate, or Hard. - Provide an analytics view
Summarize the recipe collection with basic charts and metrics, such as difficulty distribution or common ingredients, using Python’s data tools. - Deploy a production-ready version
Host the app on a managed platform with a PostgreSQL database, environment-based configuration, and working static file handling.
For the later Vue extension, I added a second set of goals:
- Expose the app through a REST API
Make the existing recipe data and user flows available to a separate frontend through Django REST Framework. - Build a modern SPA frontend
Recreate the core browsing, search, and analytics experience with Vue 3, TypeScript, client-side routing, Pinia state management, and Chart.js. - Keep both versions connected to the same product
Treat the Vue frontend as an extension of Nomalyze, not as a separate unrelated project.
I considered the project successful if:
- The Django app was deployed and accessible online with a stable database behind it.
- The difficulty labels felt intuitive for typical home-cooking recipes.
- The analytics view offered a quick, visual overview instead of just another list of records.
- The Vue frontend could consume the backend reliably and provide a more interactive way to use the same product.
- I could clearly explain the technical and design decisions behind the app to both non-technical reviewers and developers.
UX & UI considerations
Show Hide details
UX & UI considerations
This project was primarily a full-stack learning project, but my design background still influenced how I structured both the original Django interface and the later Vue frontend.
A few examples:
- Recipe form layout: I grouped related fields such as title, times, ingredients, and steps, and ordered them from most to least important. This helps the form feel less overwhelming, even though it collects quite a lot of information.
- Search and analysis flow: I separated the main search criteria from supporting guidance, so users can discover options like wildcard and partial matching without cluttering the primary controls. In the Vue version, the same idea carries over into a more interactive search and analytics experience.
- Consistent patterns: I reused the same basic layout logic and visual language across the home page, recipes list, detail views, search, and analytics screens, so the app feels coherent and predictable across both frontend versions.
- Content-first styling: I kept the visual design simple and restrained, using Tailwind CSS mostly to support hierarchy, spacing, and readability rather than heavy decoration. The focus stays on recipes, difficulty labels, search results, and charts.
Architecture Overview
Nomalyze is built around a Django backend that powers two interfaces: the original server-rendered Django app and a later Vue 3 + TypeScript single-page frontend. The backend handles the recipe data model, business logic, analytics, authentication, and REST API layer, while the two frontends explore different ways of presenting and interacting with the same product.
Show Hide details
- Django app structure: the original version follows Django’s Model–View–Template pattern. Browser requests are routed to Django views, which use the ORM to read and write recipe data and render HTML templates with the resulting context.
- Data layer: recipes are stored in a relational database, using SQLite in development and PostgreSQL in production. Each recipe records fields such as name, cooking time, ingredients, and reference links, which makes querying, filtering, and analytics straightforward.
- REST API layer: selected recipe, search, analytics, and authentication functionality is exposed through Django REST Framework, allowing the separate Vue frontend to consume the same backend data through API requests.
- Difficulty & analytics flow: the difficulty level — Easy, Medium, Intermediate, Hard — is computed in Python based on cooking time and number of ingredients. The Django version uses Pandas and Matplotlib to generate charts for server-rendered templates, while the Vue version consumes analytics data from the API and renders interactive charts in the browser with Chart.js.
- Frontend layers: the original interface is built with Django templates styled via Tailwind CSS. The Vue frontend is built with Vue 3, TypeScript, Vite, Pinia, Vue Router, Tailwind CSS, and Axios, handling client-side routing, state management, protected API requests, and interactive UI behavior.
- Deployment: the Django backend runs on Render with environment-based configuration, PostgreSQL, Gunicorn, and static file handling. The Vue frontend is deployed separately on Netlify and connects to the backend API.
What the app does
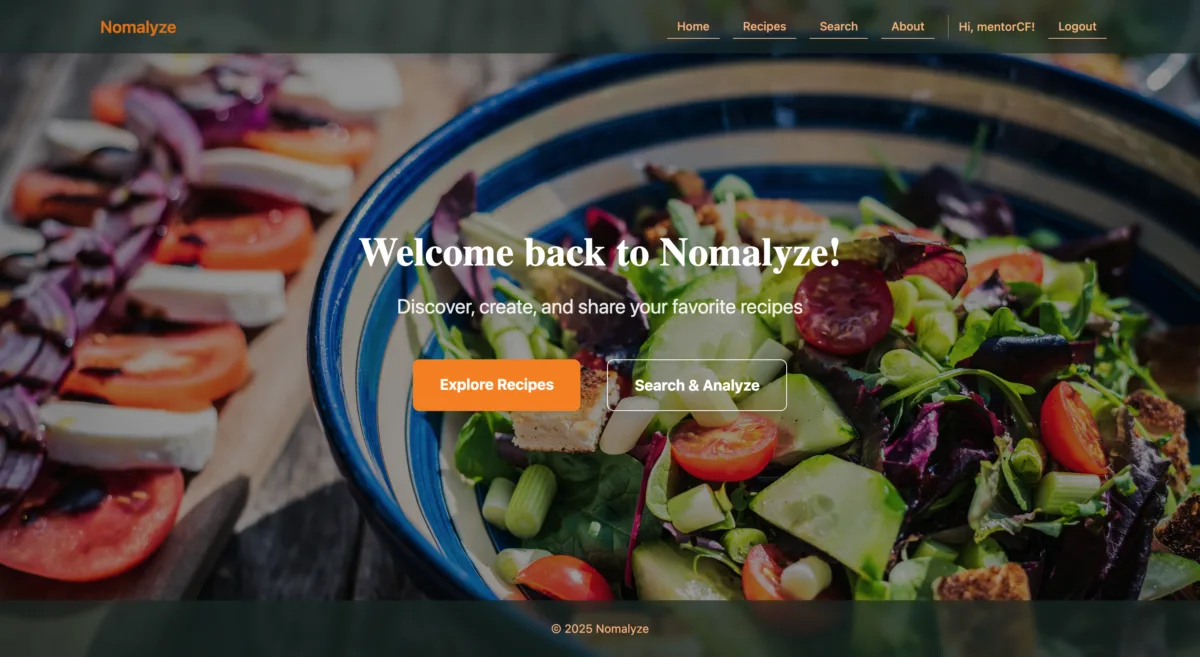
From a user’s point of view, Nomalyze lets you manage and explore a personal recipe collection through the original Django interface and a later Vue frontend.
In the Django version, users can:
- Add, edit, and delete recipes in a simple interface
- See each recipe’s difficulty: Easy, Medium, Intermediate, or Hard
- Search and filter recipes by name, ingredients, maximum cooking time, and difficulty — including partial and wildcard matches, so “Pasta al” can also find “Pasta al Pesto” and “Pasta all’Amatriciana”
- View basic analytics, such as difficulty distribution and common ingredients
The Vue frontend extends the same product with a more interactive single-page experience for browsing recipes, running searches, and viewing chart-based analytics from the backend API.
The difficulty calculation is intentionally simple and primarily serves as a learning exercise. It uses measurable fields — time and ingredients — to assign a consistent label. It is not intended to fully capture how professional cooks judge a recipe, but it shows how to turn a fuzzy idea into explainable application logic.
Implementation & Testing
Key implementation highlights
- Django data model & CRUD: Designed Django models for recipes and built standard CRUD views with templates, focusing on clear forms, navigation, and maintainable data structures.
- Difficulty logic: Encapsulated the difficulty rules in Python so labels update automatically when a recipe is saved.
- Search & filters: Implemented combined filters, including difficulty, maximum cooking time, ingredients, and partial title search using Django’s querying tools.
- Analytics: Pulled recipe data into Pandas, aggregated it, and rendered Matplotlib charts inside Django templates.
- REST API layer: Exposed selected recipe, search, analytics, and authentication functionality through Django REST Framework so the app could support a separate frontend.
- Vue frontend extension: Built a Vue 3 + TypeScript SPA that consumes the backend API, with client-side routing, Pinia state management, JWT-based authentication, and browser-rendered charts.
- Deployment: Configured separate dev/production settings, used SQLite locally and PostgreSQL on Render, managed environment variables, and deployed the Vue frontend separately on Netlify.
Show Hide details
Phase 1 – Understanding the brief and designing the data model
The course brief defined the basic idea: a Django web application that allows a user to manage recipes and see some statistics about them. Before writing any code, I translated this brief into concrete data structures.
I started by listing the information each recipe needed: title, description, ingredients, preparation steps, preparation time, cooking time, and any metadata that could influence difficulty. From there, I designed the Django models and relationships that would store this data in a relational database.
Even within a predefined brief, there were still small but important decisions to make: how to structure the fields, which values should be required, and how to prepare the data model for later features such as difficulty calculation and analytics. Getting this right early made it easier to write queries, build views, and extend the app later without having to constantly refactor the database schema.
Key learning: Even in a student project, thinking carefully about the data model saves time later, especially when analytics and custom logic depend on it.
Phase 2 – Building the core recipe experience (CRUD and navigation)
Once the data model was in place, I focused on the core experience: letting a user manage their recipes. This meant implementing the usual CRUD flow (create, read, update, delete) using Django views and templates.
I built pages for:
- viewing the list of recipes,
- adding and editing a recipe,
- and viewing the detailed page for a single recipe.
Throughout this phase, I tried to keep the interface simple and predictable: clear labels, logical grouping of fields, and straightforward navigation between listing and details. Tailwind CSS helped me quickly get to a clean, readable layout without spending too much time on custom styling.
The main challenge here was balancing completeness with clarity. The brief required several fields per recipe, and it’s easy to overwhelm users with a long form. I responded by grouping related information and focusing on a hierarchy that made sense from a cook’s point of view (title and key times first, less critical details later).
Key learning: A CRUD interface is more than just forms and tables; the way you present and group information strongly affects how usable the app feels.
Phase 3 – Turning “difficulty” into working logic
A central part of the assignment was to go beyond simply storing recipes and introduce some kind of intelligence. In Nomalyze, this took the form of a calculated difficulty level for each recipe, using four labels: Easy, Medium, Intermediate, and Hard.
Within the framework of the brief, I implemented a difficulty calculation that looks at several measurable aspects of a recipe, such as:
- how long it takes to prepare and cook,
- and how many ingredients it uses.
Based on these inputs, the app assigns the appropriate difficulty label and keeps it in sync when a recipe is saved or updated. The logic is encapsulated in the Django code so users don’t have to set the difficulty manually.
For the scope of this course project, the algorithm is intentionally simple and primarily serves as a learning exercise in translating a real-world concept into code. It’s not meant to capture every nuance that professional cooks or serious food enthusiasts would use to judge the true difficulty of a dish, but it does provide a consistent and explainable rule set for the app.
The hardest part was translating an intuitive, human idea (“this feels hard to cook”) into concrete rules and thresholds the app could apply consistently. I iterated through a few approaches and chose one that remained simple but still matched a basic common-sense expectation: very long or very complex recipes skew towards Hard, while short and straightforward recipes stay on the Easy end of the scale.
Key learning: Even a simple algorithm forces you to be explicit about assumptions. That exercise is very similar to what happens in real-world business rules.
Phase 4 – Adding search and filtering
Once the basic recipe management and difficulty calculation were in place, the next step was to make it easier to find relevant recipes inside the collection.
I added:
- a search function for recipe titles (and, depending on the implementation, other fields),
- filters based on difficulty level,
- and additional filters defined by the brief, such as time or categories.
The course also defined a bonus requirement: support wildcard and partial search queries. For example, searching for “Pasta al” should still return recipes like “Pasta al Pesto” or “Pasta all’Amatriciana.” I implemented the search logic to handle partial matches so that users don’t have to type the exact full title to find what they are looking for.
On the technical side, this meant writing Django queries that could combine multiple filter conditions and partial matches without becoming too complex or inefficient. On the UX side, I tried to keep the search and filter controls visible and understandable without overwhelming the page.
The challenge here was preventing the interface from becoming cluttered. Recipe apps can offer many potential filters, but exposing too many at once can confuse users. I prioritized a small set of filters that connected directly to the project’s main idea: exploring recipes by difficulty and key characteristics.
Key learning: Useful search and filtering is as much about deciding what not to include as it is about the queries themselves.
Phase 5 – Building the analytics view with Python’s data tools
To meet the analytics requirement in the brief, I created a dedicated analytics view that summarizes the recipe collection. Instead of only browsing recipes one by one, the user can see aggregate information: for example, how many recipes are Easy, Medium, Intermediate, or Hard, or which ingredients appear most frequently.
Under the hood, this view pulls data from the database, processes it with Python’s data libraries (such as Pandas), and then generates charts using a plotting library like Matplotlib. These charts are rendered in the Django templates so they appear as part of the web interface.
The main challenge was integrating these libraries into a normal web request cycle. Tasks like data aggregation and chart generation can be heavier than a typical page load, so I had to think about how much processing was reasonable to do on each request and how to keep the analytics focused on the most useful metrics.
In the original Django version, the analytics charts are generated server-side and rendered into Django templates. In the later Vue frontend, the same product idea is handled differently: the frontend consumes analytics data from the backend API and renders charts in the browser. Comparing the two approaches helped me better understand the tradeoffs between server-rendered output and client-side data visualization.
Key learning: Bringing data tools like Pandas into a web app is a powerful way to add value, but it also requires careful decisions about performance and what is truly useful to show.
Phase 6 – Preparing the app for production and deploying to Render
The final phase was to move Nomalyze from a local development environment to a live, publicly accessible one. The course required a real deployment, not just screenshots, so I set the app up on a platform-as-a-service provider (Render).
This meant:
- configuring separate settings for development and production,
- using SQLite locally but PostgreSQL in production,
- managing environment variables for sensitive data like secret keys and database URLs,
- and setting up static file handling (for CSS, images, and other assets) so they are correctly served in a production environment.
Learning to work with environment-based configuration and a production database was a significant step beyond running python manage.py runserver on my machine. I also had to troubleshoot common deployment issues, such as missing environment variables, database migration problems, or static files not loading correctly on the live site.
Key learning: Deployment forces you to think like a real-world developer: not just “does it work on my machine?” but “is this secure, configurable, and reliable in production?”
Phase 7 – Extending Nomalyze with a Vue frontend
After the original Django version was complete, I revisited Nomalyze to explore how the same product could work as a modern single-page application. Instead of replacing the Django interface, I added a separate Vue 3 + TypeScript frontend that consumes selected backend functionality through a Django REST Framework API.
This phase introduced a different kind of challenge from the original server-rendered app. The Django version handles routing, rendering, and form submission mostly on the server. The Vue version moves more responsibility to the browser: client-side routing, state management, API requests, authentication state, loading and error states, and chart rendering.
I structured the Vue app around views, reusable components, Pinia stores, router configuration, shared types, and an API client layer. The frontend connects to protected backend endpoints, handles JWT-based authentication, and presents recipe browsing, search, and analytics in a more interactive interface.
This extension also helped me compare two different frontend approaches on top of the same product idea:
the Django template version, where the backend renders complete pages;
and the Vue SPA version, where the frontend consumes JSON data from the backend and updates the UI in the browser.
The goal was not to build a completely new product, but to deepen the existing one and practice a modern API-driven frontend architecture using a stack closer to what many product teams use in production.
Key learning: Extending an existing backend with a separate SPA makes the boundaries between backend, API, state management, and UI much clearer. It also forces more explicit thinking about authentication, data flow, error handling, and how much logic should live on each side of the application.
Testing strategy
Nomalyze includes automated backend tests with Django’s testing tools and selected frontend unit tests with Vitest and Vue Test Utils, plus manual browser testing for the main user flows in both the Django interface (including the admin) and the Vue SPA.
Show Hide details
- Automated backend tests (Django):
- src/recipes/tests.py covers the core of the app:
- models (validation, difficulty calculation, ingredient parsing)
- views (home, recipe list, detail, and the search/analytics view)
- forms (search form validation)
- URLs and templates
- chart utilities and wildcard search behaviour
- basic admin configuration
- API behaviour for the Vue frontend (protected recipe/search/stats endpoints and JWT-based access)
- src/recipe_project/test_auth.py focuses on authentication flows, including login/logout views and session handling.
- In total, 151 backend tests run via Django's test runner (python src/manage.py test, or ./manage.sh test in the current setup), all passing.
- src/recipes/tests.py covers the core of the app:
- Automated frontend tests (Vue):
- A separate unit-testing layer with Vitest and Vue Test Utils covers selected frontend behaviour:
- authentication state management
- the Axios client and JWT refresh behaviour
- recipe card rendering
- search form behaviour
- 27 frontend tests run via pnpm test:unit, all passing.
- A separate unit-testing layer with Vitest and Vue Test Utils covers selected frontend behaviour:
- This gives the project test coverage on both sides of the architecture: Django tests verify backend logic, server-rendered views, authentication, and API behaviour, while Vue tests cover key frontend state and component interactions.
- Manual testing:
In addition to automated tests, I manually exercised the main user flows in both interfaces: creating, editing and deleting recipes through the Django admin; running different search/filter combinations; checking difficulty labels and analytics output; logging in through the Vue frontend; browsing recipes and recipe detail pages in the SPA; and testing protected API-driven flows, loading states, error states and chart updates from a user's point of view.
If I revisit the project, natural next steps would be to expand the automated tests around edge cases in the difficulty algorithm, more complex search/filter combinations, API error responses and additional Vue component states, as well as adding end-to-end regression coverage for the full login → search → detail → analytics journey across the deployed frontend and backend.
Tech Stack
Backend
- Python
- Django
- Django REST Framework
- JWT authentication
Frontend
- Vue 3
- TypeScript
- Pinia
- Vue Router
- Tailwind CSS
- Chart.js (for interactive analytics charts)
- Django templates (legacy server-rendered frontend, still live at nomalyze.com)
Data
- PostgreSQL
- SQlite (for local development)
- Cloudflare R2 (S3-compatible media storage)
- Django ORM
- Pandas (for analytics data aggregation)
- Matplotlib (for the legacy UI's server-rendered charts)
Testing & tooling
- Axios (HTTP client with JWT refresh)
- pnpm (developer experience)
- Vite
- Vitest
- Vue Test Utils (for component testing)
- Django test runner
- coverage.py (for backend test coverage)
- GitHub Actions (CI: lint, tests, security scan, build checks)
- Docker (containerized local dev environment)
Deployment
- Render (hosts the Django backend)
- Netlify (hosts the Vue SPA)
- Gunicorn (production WSGI server)
- WhiteNoise (for static file serving)